BAM Family

BAM Family

Labels

Showing posts with label fun activities. Show all posts

Sunday, June 8, 2014

Summer (Sanity!) Schedule

School is out! WOO HOO! No more crazy mornings, making lunches, scrambling out the door just in the nick of time…! Just days of fun…!

….long…days….of…fun.

Emphasis on "long."

Maybe you are like me and feel like "Oh my…how am I going to keep my kids happy this summer while also keeping my own sanity?

(on top of just day to day sanity I am also teaching online this summer. Oh, and I'm pregnant too.)

So, I decided to put together a little plan to help give us some structure to our long summer days.
Micah and Benji get up before I do and can do the first 3 by themselves. I usually get up around 7:30 or 8 and then we eat breakfast. 

"Clean up" will consists of general toy pick up and regular house work. It will also be an opportunity for the boys to earn "Bucks." (See below!)

Our Activity time will be anything from 
Playing at the park
Wednesday Playdate with friends
Going to Kids Cove
Going to the Library
Running errands 
Cooking Time
Doing work sheets or reading books
Painting/crafts
Playing in the bath (a favorite, especially for Benji)
Legos, Trains, etc. 
Or…if I am truly exhausted and have no creativity, playing educational games on the computer

After lunch is Rest Time which is ESSENTIAL to both  my sanity and the fact that I am working from home. Silas starts his nap at 12:30 and I am going to make the big boys lay down then too (or around there). Then I can get some work done on the computer and/or rest if I need to. TV time afterward is contingent on the big boys taking a good nap/rest (2 hours). 

My motivation is super-low in the late afternoon so I have a pretty lax schedule after Rest Time. 

I am hoping that our schedule will lead up till 5pm when DADDY COMES HOME FROM WORK!!! (aka the best part of the day!)

Bucks System
As a way to motivate my 6 year olds to do housework, summer work sheets, and general good behavior, as well as teach them about spending and saving, I made some "Behavior Bucks." 
I printed them on colored card stock  for free from this website
The boys can "Earn the Bucks," "Spend the Bucks," or "Lose the Bucks." Here are some examples below of how each one works in our family.
They can also earn bucks for a "Cheerful Attitude" or "Helping with Silas" or "Special Chores with Daddy"
So far, most of the bucks have been spent on iPad playing (also candy). They keep saying they want to save for
Toys R  Us but it is HARD (Saving is hard for all of us, isn't it?)
The boys can "Lose the Bucks" too. This has proven a pretty effective discipline method so far (even in just warning them that they are about to "LOSE THE BUCKS!"). 
I am hoping that our "Bucks" system will provide some structure and motivation to our day for chores and summer school work like reading and handwriting sheets. 

So, there it is: Our Summer (Sanity) Schedule. 

I really want to keep these faces smiling! (and mine smiling too!)


What are YOUR plans for the summer? How do you plan to keep (ha!) your sanity as well as keep your kids busy and happy?

Share your ideas below!  

Tuesday, June 4, 2013

Our Summer Reading and Writing Adventure!

Today we started our great Reading and Writing Adventure! 
I wanted to keep the boys' school skills fresh this summer and in order to encourage them (hey, who am I kidding? I need to encourage ME!) to do reading and writing every day, we made this super cool chart/game today. It kinda looks like CandyLand! (right?) 
Anywho, here is how the game works. For each book we read out loud together (because I am not above bribing my kids to read with me) they get a sticker (one sticker per boy/book per day. The number of books we read is unlimited). 
For each worksheet they complete, they get a sticker too!
I made copies of this number and letter workbook we have so they can practice their writing throughout the summer. 
 Today they worked on some coloring. 
Coloring isn't their favorite thing in the world but I am just glad they actually completed the sheet! 
 And they got a sticker! 
We did some reading this afternoon so now there are 4 stickers on our chart. 
 There are 102 squares on our chart (I decided to go for a nice round number....just kidding. That's just how many squares it took to fill in my squiggly line on the poster board. 
My math major husband reminded me that 102 is not divisible by 4). 

When we get to 102, we get to go to TOYS R US to pick out a new toy! The boys can't wait. 
Really. They wanted to go today. 
I reminded them 7 times that this chart is going to take lots of hard work and patience. 
So, while we wait to get to TOYS R US, we have some Star incentives along the way. There are 11 stars (I just asked the boys where we should put the stars and we ended up with 11. Go figure).

At each star we will pick a Star Card and do something fun like "Play the Wii" or "get a slush from Sonic." Hopefully the Star Cards will keep the boys motivated this summer until we get to Square one-oh-two. 

I really have no idea how long it will take us to complete the chart. We may need to make another chart before the summer is over. (fingers crossed...maybe that is just wishful thinking...)

I am hoping that our great Summer Reading and Writing Adventure Game will keep us all motivated to keep practicing those skool skillz...

What do you do to keep your kids' academics fresh over the summer? 

Thursday, October 11, 2012

DIY Wild Kratt's Creature Power Suit

Have you seen the PBS show "Wild Kratts"? 
My boys love it! The show is based on two brothers who (in real and animated life) are animal explorers. When they are learning about or rescuing an animal, the Kratt brothers don "Creature Power Suits," insert a "Creature Power Disk" and then take on the powers of the animal. 
It is a fun concept and show, as well as educational. Plus, pure fun for active little boys!
So, for their birthday, I made Creature Power Suits for the boys. I saw several examples online of other moms who made vests like these and after viewing their pictures, I just made up my own pattern by tracing a large version of one of the boys' shirts. 
I made them out of polar fleece though I have seen other people make vests out of felt, or even a t-shirt with the arms cut out. I wanted my vests to be washable (just in case) so I sewed everything on but hot glue would work too for a fun, dress up outfit. 
The best part about the Creature Power Suits is the Power Disks!
Some wonderful bloggers have designed Power Disks and made them available on their blogs for free printing. 
I got my disks from here and here.
We don't have a color printer so I got them printed on card stock and laminated at a local print shop for under $4. Sweet!
We hot glued the soft side of velcro on the backside of the disks (sticky side was sewn on the middle circle of the vest). I sewed a small pocket on the side of the vest to keep the disks in--easy access to change your Creature Power quickly!
The best part? I think this picture says it all!! Both of them are sporting CHEETAH POWER!

Ok, I just had to include this picture because it was funny.....picture taking problems at 39 weeks pregnant. 

Monday, April 30, 2012

Rainy Day Fun: The FORT!

Since it's been so cold and rainy lately, we decided to build a fort. I say "we." I should say, the boys begged me to built them a fort. I finally gave in. (It was not as much of a hassle as I thought it would be)
The boys loved it!
Look at those smiles!
Yeah....we didn't get dressed this morning....
....but they are still SUPER handsome little men! 

Saturday, November 26, 2011

DIY Countdown to Christmas

Christmas is coming!!! 
When I was a kid, I always loved one-a-day countdown to Christmas activities. We usually had one of those Advent calendars where you opened up a little "door" a day or this Advent calendar (we had this one when I was a kid and my parents very generously bought it for us this year!) 
In addition to our one-a-day Nativity Advent Calendar, I made a one-a-day Countdown to Christmas using this picture via Pintrest as my inspiration. I made the envelopes out of fleece by hand-stitching them together and embroidering the numbers. I also made the buttons out of Sculpy clay and sewed them on (I started this project last Tuesday and finished today so it took me a few days).
 I am going to put little gifts or pieces of paper with fun activities that we will do each day leading up to Christmas
Thu1. Tow Mater Socks (Dollar Section at Target)
Fri2. Make Cookies with Mommy/Christmas Party!
Sat3. Make Christmas snowmen ornaments
Sun4. Mini Candy Canes
Mon5. Corduroy Christmas Book (a lift-the-flap book I got at the used book store)
Tue6. Make Nativity toys (been saving the toilet paper rolls!)
Wed7. Drink hot chocolate with marshmallows
Thu8. Chocolate Candy
Sat10. Watch Veggies tales Christmas movie
Sun11. Mini Candy Canes
Mon12. The Night before Christmas book (used bookstore)
Tue13. Play games on the computer (evening)
Wed14. Ride on Train at the mall
Thu15. Chocolate Candy
Sat17. Bubble bath (Dollar Section at Target)
Sun18. Mini Candy canes
 Mon19. Make Christmas Cards for Teachers 
Tue20. Play games on the Wii (evening)
Thu22. Chocolate Candy
Fri23. Go look at Christmas lights
Sat24. Away in the Manger Book (used bookstore)
We don't have a lot of money for Christmas presents this year but I am hoping that we can make some great memories together with these special activities
 I am looking froward to celebrating the whole month with Micah
...and Benji. 
Oh, and Aaron too. :) 

How do you count down to Christmas? Please share your ideas and traditions! 

Monday, September 19, 2011

Kids Crafts: Felt Puppets (A Tutorial)

A week ago we went to the library and played with their wide assortment of puppets. I had so much fun carrying on a conversation with a giraffe, astronaut and little girl (with Micah) that I wanted to try my hand at making some puppets to play with at home. 

Want to make your own? 
Here's what to do!
Supplies:
Wide assortment of felt pieces
Paper
Marker
Scissors
Glue gun (or tacky glue)
Sewing machine

First, trace around your hand imagining your three middle fingers as the head and your pinky and thumb as arms. Be sure to leave a wide opening at the bottom for the hand to slip in and out easily. 
Fold paper in half and cut out to ensure a symmetrical puppet pattern. 

Fold your pattern in half and pin to your felt. Cut two. 
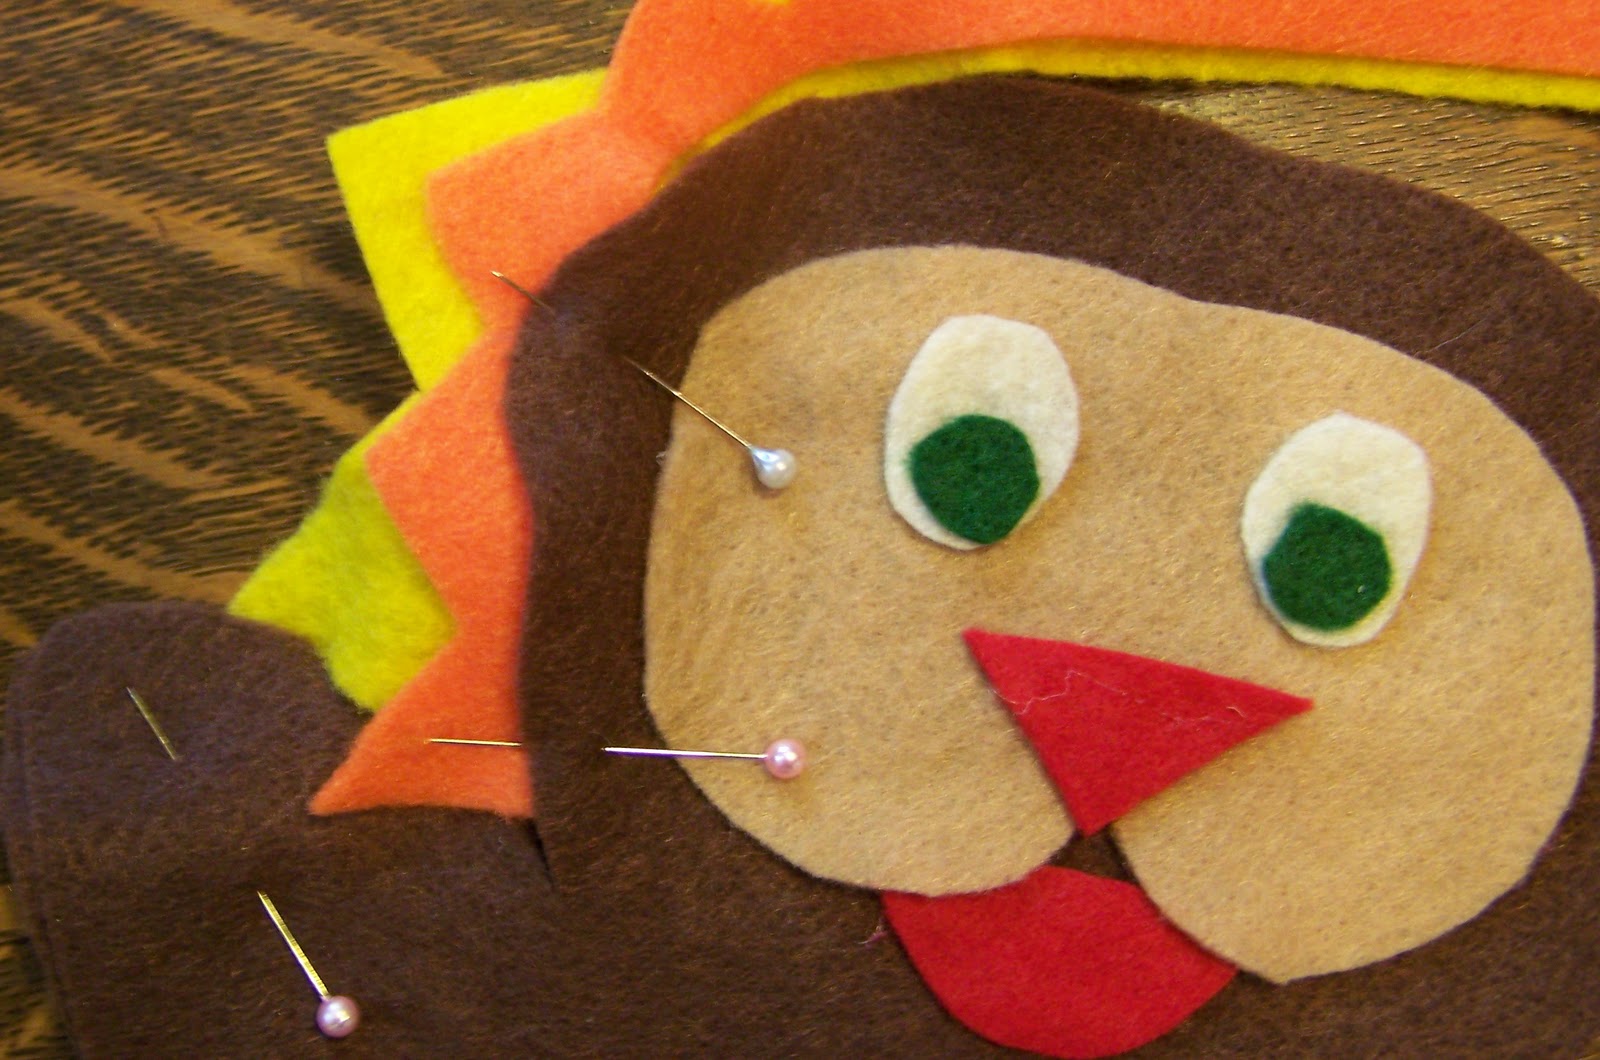
Decide what animal you what your puppet to be and cut out face shapes: eyes, ears, nose, mouth (you get the picture). This little guy is a LION so he has a bright orange and yellow mane! 
Hot glue the face on (or use tacky glue if you don't have a glue gun. Elmer's is too thin to really grip the felt so use a thicker glue. Wait a few hours (or over night) to enjoy your puppet if you don't use hot glue)
All glued!
 Pin the mane. This may be a bit tricky if you cut your mane out of a straight piece of felt like I did--it works though!
Lots o' pins! 
Pin the ears on too. I put a fold in the ears to given them a little 3D body. 
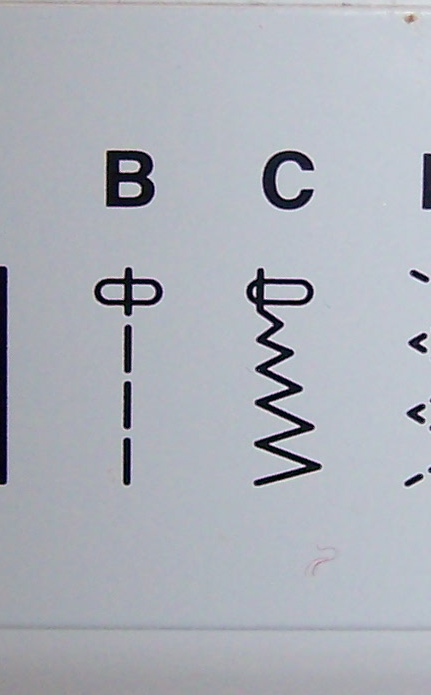
I used a straight stitch for the body and then switched to a zig-zag for around the head. 
Since there is no turning in this project (I didn't want to lose any volume in the puppet by turning it), sew really close to the edge. 
The zigzag stitch gives a little extra detail to the head (especially for the lion's mane!) and it helps grip all those pieces you are trying to sew together. 
After you are done sewing, check your seams to be sure that you caught both the back and the front. I had to sew around the head again. 
Yea! Your lion is done! Let's play! 
(Micah took this picture! Pretty good for an almost-four-year-old, right?)
My sweet Micah with his lion.
(We just can't time the smile with the camera click. Oh well.)
A puppet is a good TV watching buddy
Benji with the Lion
But one puppet isn't enough! We made a chicken too! (At Micah's specific request! And this is another one of his pictures too! I think the kid has an eye for this sort of thing...)
Micah captured a crazy moment with Mommy and the chicken. 
(Yes, it does look a bit like a turkey. But he picked out the colors. Go figure. It is a nice, brown chicken)
Have a puppet show over the back of your couch! 
(Let's hope the Lion and the Chicken don't realize they are on opposite ends of the food chain. Right now, when asked, both Lion and Chicken state that they eat "seeds." Though, there is a different, more hilarious, answer in the video below)
Yea for PUPPETS! Go ahead and make your own! 
The best part of this short video is Micah's answer when asked, "What do chickens eat?" LOL

Like this? Share it!

LinkWithin

Related Posts Plugin for WordPress, Blogger...