BAM Family

BAM Family

Labels

Showing posts with label Crafts. Show all posts

Wednesday, February 11, 2015

EASY DIY Stained Glass Valentines

I really like Valentine's Day because well...CRAFTY. However, my boys do not like CRAFTY so I have to be really tricky creative to get them to do crafts. The most important quality of any craft we do is that it has to be EASY.

So, I give you the boy-friendly (and beautiful!).... 


Stained Glass Valentines

Supplies:
Printer Paper (or card stock) This was a what-do-I-have-in-the-house-craft so I used printer paper
Tissue Paper (So glad I am a gift bag/tissue paper hoarder!)
Contact paper
Scissors
 First, cut the printer paper into quarters. Then tear the tissue paper (any colors you want/have!) into small pieces. The boys really liked this part.
Fold each quarter paper in half and cut out a heart. 
  
We are making these Valentines for the boys' classmates so the boys wrote the name of each classmate and their names on each one.
 Cut a piece of contact paper. Peel off the back and place the sticky side up on a table.  Carefully stick each heart shape piece name-side down on the contact paper. 

Cover with tissue paper!!!
Have fun! Go nuts! Be Valentine-y!
Cover the the cards with another piece of contact paper and smooth down carefully, trying to avoid air pockets.
Cut out each card. 
DONE!
Pat yourself on the back and admire your craftyness and the fact that you tricked your sons into enjoying a craft.  
Give your Valentines to your friends.
Or hang them in the window!

HAPPY VALENTINE'S DAY!

Thursday, December 19, 2013

FREE Stocking Stuffers Your Kids Will Love

For some reason, when thinking of stocking stuffers for my kids, all my brain was saying was "Uhhhh….?"

Then I started thinking about things my kids really like to do. Two of their favorites "special treats" are playing Angry Birds on my iPad and watching shows on Netflix. They only get to do these activities on special occasions so I thought…

"What about a coupon book?" 
 Coupons are easy and FREE and I know my boys will LOVE coupons for Angry Birds...
…and Netflix. I made 3 coupons for each activity with a check box to mark when the coupon has been redeemed. I'm sure these coupons will get good use over Christmas break!

I cut out some printable tags, wrote the coupon info, cut some wrapping paper to size, and stapled. BAM!
What do your kids love to do? Make some coupon books and stuff those stockings!
Your kids will love you! 

Monday, February 11, 2013

Eye (heart) U: DIY Valentine's for kids

I loved making Valentine's when I was a little girl. In fact, I loved making anything. However, I am the mother of two rowdy boys who aren't really into "making things." They needed to bring Valentine's to school for each class though and I wanted to do homemade valentines with them

Enter the Super-Simple, Super-CUTE Valentine solution!
Eye (heart) U
or 
I love you (even a kid can read this!) 
It doesn't get much easier than this. Googly-eye + paper heart + handwriting practice. 
Yep. That's about it. 

And they turned out so adorably! I love them. 

We made 40 valentines for about $3.50. Not bad! (if I do say so myself!)
We made the Valentines over 4 days. This four day process was a testament to how much my boys don't like to do crafts (or practice their handwriting) and how little patience I have. In fact, the first day, it was a toss-up who screamed more: three-month old little brother (who was ignored during the crafting process) or me ("write your name!! Stop..will you just..! here...NO! Glue it...ahhh!!!!)
Just keepin' it real, folks. 

The next 3 days went much smoother. No one screamed. 
In fact, we even had fun! :) 

Happy Valentine's Day! 

Saturday, November 17, 2012

DIY Felt "Paper Dolls"

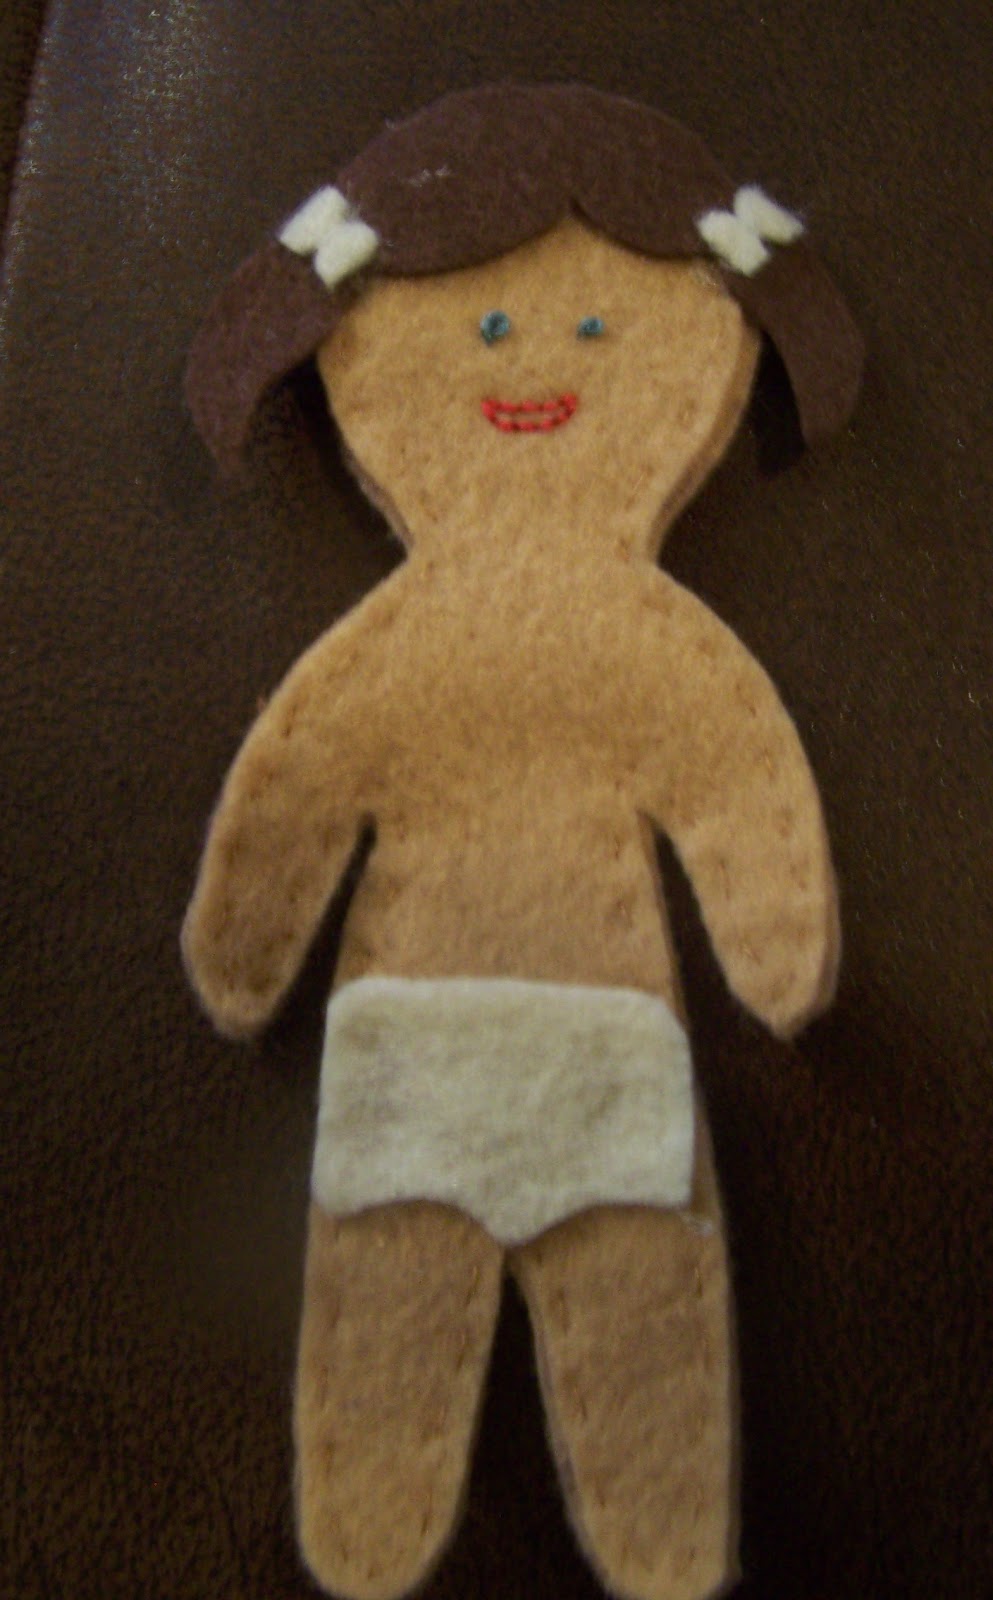
I loved paper dolls when I was a little girl. The only problem with paper dolls is that you have to be really careful with them so that they don't rip. Wouldn't a "no-rip" paper doll be great? Enter the Felt "Paper Doll"--the perfect paper doll for little girls with little hands. 
Shhh! This doll is for my 2 year old niece, Taegen. She is traveling to my house in Virginia from Kansas with her parents as I type (so I have no worries about her--or my sister--seeing this post before she gets here). 

Want to make your own? here is how I did it: 
Draw a doll figure. I like to make the head a little bigger because that is how little kids look--big noggins, ya know?
This was probably the "hardest" part (and not really hard at all, even if you think you can't draw). 
Here is a tip: free hand draw and then fold the drawing in half length-wise and cut out. That way, your doll will be symmetrical. 
Next, trace the doll in black marker on another piece of paper. 
Now to draw the clothes.
Lay another piece of paper on top of the marker drawing. 
Use the doll template to draw clothes right on top! 
A shirt....
A dress? Pants? Skirt? Ballerina tu-tu? Whatever you want! 
By drawing on top of your marker drawing, you can make sure that the clothes will fit the finished doll. 
I actually cut two doll shapes and hand sewed them together to give the doll a little more stability. Hot-gluing two doll shapes together would work well too.
I also hot glued the hair (which I drew using the marker template as well) and underwear on (don't judge me for the huge man-panties on this doll...I'm not perfect...)

I made the face with embroidery thread but hot gluing felt eyes and mouth or even drawing a face would work too. 

Next, use your clothes patterns to cut out clothes from felt. 
Skirt and shirt!
Shirt and pants!
Little red dress? Yes, please!
Ballerina tu-tu? Adorable!
Go wild! Cut and coordinate lots of outfits. Felt sticks to felt so making the cloths out of felt will ensure that your little girl will have hours of fun putting clothes on her new little friend. :) 

I hope my niece loves her new "paper doll" and I hope your little girl will love her's too! Make one today! 

Thursday, October 11, 2012

DIY Wild Kratt's Creature Power Suit

Have you seen the PBS show "Wild Kratts"? 
My boys love it! The show is based on two brothers who (in real and animated life) are animal explorers. When they are learning about or rescuing an animal, the Kratt brothers don "Creature Power Suits," insert a "Creature Power Disk" and then take on the powers of the animal. 
It is a fun concept and show, as well as educational. Plus, pure fun for active little boys!
So, for their birthday, I made Creature Power Suits for the boys. I saw several examples online of other moms who made vests like these and after viewing their pictures, I just made up my own pattern by tracing a large version of one of the boys' shirts. 
I made them out of polar fleece though I have seen other people make vests out of felt, or even a t-shirt with the arms cut out. I wanted my vests to be washable (just in case) so I sewed everything on but hot glue would work too for a fun, dress up outfit. 
The best part about the Creature Power Suits is the Power Disks!
Some wonderful bloggers have designed Power Disks and made them available on their blogs for free printing. 
I got my disks from here and here.
We don't have a color printer so I got them printed on card stock and laminated at a local print shop for under $4. Sweet!
We hot glued the soft side of velcro on the backside of the disks (sticky side was sewn on the middle circle of the vest). I sewed a small pocket on the side of the vest to keep the disks in--easy access to change your Creature Power quickly!
The best part? I think this picture says it all!! Both of them are sporting CHEETAH POWER!

Ok, I just had to include this picture because it was funny.....picture taking problems at 39 weeks pregnant. 

Sunday, September 30, 2012

Nursery Art: Tree of Blessing for Baby

Our small group at church gave me a baby shower a few weeks ago and before I opened each lady's present, they each read a personalize verse of blessing for Baby Silas. Each verse was printed on a leaf. I loved all the verses so much that I wanted to encorporate them into Silas's nursery decor. 
 So I made a Tree of Blessing today!

Armed with my 40% off coupons, I went to Michael's today and bought a 20x24 canvas and some card stock. I have a TON of paper left (YEA! More crafts!)--I really only used 2 pieces of paper for the tree and then small scraps for the birds. 
I tore the brown paper into strips of varies sizes and laid them out on the canvas with the leaves until I liked the arrangement. 
Then I used a small foam brush and some diluted Elmer's glue (so it would spread better) and glued everything in place. 
Next, I drew the birds free-hand, cut them out, and glued them in place. 
I used 4 birds, one for Aaron, me, Micah and Benji, all looking over Silas as he comes into our family. 
 (you know you are an impatient blogger/crafter when you take pictures before the glue has even dried. ::hangs head in shame::)
(BTW, all the leaves had hole punches in them because at the shower they were hung on tree branches with ribbon).
As you can see, (or click on the picture to see it larger) each leaf has a verse on it that is personalized with Silas's name. So special!
 I plan on hanging the canvas in his nursery as both art and an image of blessing for him as he grows.
YES! One more project done before he arrives!! 

Monday, May 21, 2012

Sweet nest necklace

Google is a wonderful thing. So are craft blogs. And so is pintrest. Using these three tools, I was able to create this sweet nest necklace for my friend Debbie who is expecting her third baby very soon! 
I followed this tutorial but made the nest look a little more rustic than the examples shown in the tutorial. After all, birds' nests are messy and organic (much like motherhood itself, right?). I love the way the nest turned out! And Debbie loved it too!

(the boys loved the nest too and asked me to make them each one. So now we have two nests floating around the house. lol!)

Sunday, April 29, 2012

Crafts for boys: Medieval Trebuchet!

I have loved "making things" since I was a little girl, especially paper crafts. My boys, however, often do not share the same love. In fact, it is hard to find crafts that they will 1. Like to make, and/or 2. Actually play with after mommy forces helps them make it.

Well, the other day I stumbled across this AWESOME site that has free paper toys to print and make at home! I decided to make this Medieval Trebuchet  while the boys napped. 
This toy has ultimate "boy appeal." 
1. It's a weapon
2. It shoots things
3. It is cool to shoot things

Plus, I really enjoyed making it!! WIN WIN!

Here's how it works:

Get some ammo: 
We tried macaroni, beads, the ends of q-tips and balls of tissue paper. We had fun testing how far each type of ammo would go.
Load up the basket with your choice of ammo!
Pull back....
 ....and LET GO! (See the bead???)
 There it goes!!!
Make two Trebuchets and you can have a battle!

Both boys (especially Micah) really enjoyed this toy and played with it for about 45 minutes 
(Definitely a homemade-toy record!)
Go ahead! Make one yourself for or with your boys or girls. It was easy and fun!
And check out the website for other really fun craft ideas!! I can't wait to try out some more....

Tuesday, February 7, 2012

Valentine's Garland

Valentine's Day is a week from today! I decided to do a little V-day decorating: A Heart Garland!
 I used this simple picture tutorial I found on Pintrest
 All you need is paper (I used cardstock) scissors, and a stapler
 Sweet little hearts!
Looks like my draping skills need a little work but I think it adds a pretty addition to our dining room. 

Happy Valentine's Day!

Like this? Share it!

LinkWithin

Related Posts Plugin for WordPress, Blogger...