BAM Family

BAM Family

Labels

Wednesday, August 31, 2011

Recipe: Calzones

Mmmmm! Who doesn't love Calzones, or pizza in a pocket? I can't think of a man, woman, or especially, a child who would refuse such a dinner! Plus they are super budget friendly as you can use leftovers veggies and very small amounts of meat!

Calzones are really easy to make, especially if you use a store bought pizza dough (the kind found in a pop-open tube. Pillsbury sells a good Thin Crust one that is perfect for calzones!). One tube of dough makes 4 calzones (Four calzones were enough to feed our family of four--the boys shared, I ate one, and Aaron at two). But, if you have time, make your own dough--it is delicious! Really. It is worth it.

Ingredients

Dough:

1 1/2 teaspoons yeast
1 tablespoon honey
1 cup warm water
1 1/2 teaspoons salt
2 1/2-3 cups flour

Filling:

Shredded Mozzarella or Pizza Blend Cheese
Favorite Pizza toppings:
mini pepperoni (or large pepperoni cut into fourths)
sausage (crumbled breakfast or Italian. Save some out after Spaghetti night! Or crumble up leftover meatballs)
Ham (sandwich meat)
peppers and onions, diced (sautéed until tender-crisp. I used leftovers from fajita night)
Black Olives (leftover from taco night?)
Mushrooms, lightly sauteed
Etc.

Favorite Pizza Sauce for dipping on the side (I have made these with sauce inside but they are better with just the filling and cheese inside and sauce on the side)

Make it! 
If using store bought dough, unroll and cut into four rectangles.

OR

Soften together yeast, water and honey.

Add salt and flour to make a soft dough.

Knead 10 minutes (It seems like a long time but keep at it. The kneading is what gives the finished crust that nice chewy pizza quality), or till smooth and elastic, adding flour if necessary to keep from being sticky.

Cover and let rise till doubled (about 1 hour - less if using rapid rise yeast).

Punch down. Divide into six sections and roll out in rounds 1/4 inch thick.

Spray cookie sheet (not air bake) or pizza pan generously with cooking spray (You'll need two if you make homemade dough). Assemble the calzones on the baking sheet so you don't have to transfer the doughy packets later.

Add filling--I like to add cheese on the bottom, then top with veggies, meats, etc, and then top with a little more cheese. That way you get cheesy goodness all around. (my mouth is watering as I type....)

TIP: don't go crazy with the filling. You want to be able to close the calzone.

Fold dough over filling, tucking in any stranglers. Use a fork to firmly crimp the edges.

Spray tops of calzones with cooking spray or brush with Olive Oil. This will give the crust a nice shiny, crispy top. If you like, sprinkle lightly with garlic powder, Italian herbs and onion powder.

Cut 2-3 small slits in the top of the calzone with cooking sheers to let the steam escape.

Bake at 400 for 10-15 minutes. Calzones are done with they are golden brown on top.
Let cool for 5-10 minutes (as they will be screamin' hot and you will burn the roof of your mouth trying to scarf down the goodness that is the calzone if you try to eat it as soon as it comes out of the oven).

Serve with warmed pizza sauce on the side and a big ol' salad.

Hey family! Dinner's ready!!
(Dough recipe curtesy of Food.com)

Sunday, August 28, 2011

Meng Menu


Sunday: Homemade Calzones, ceaser salad
Monday: Shrimp and grits, steamed broccoli
Tuesday: Frozen Pizza, salad
Wednesday: BBQ Pork Ribs, baked beans, baby carrots
Thursday: Pan Seared chicken, rice, green beans
Friday: Sandwiches/wraps, chips, fruit salad
Saturday: Leftovers

Grocery shopping victory! $104!

Stay tuned for a recipe for the Calzones soon! Yum!

Saturday, August 27, 2011

Sewing for me: The Dolman Darling Sweater

I made a new shirt!--really, I guess, a sweater since the fabric I used is a super-soft woven knit. It is my own design--and really easy at that! It is a Dolman sleeve sweater, which means it has a front and a back, no separate sleeve pieces! 
Here is a little of how I made it (I didn't document the whole process since I was a little unsure of how it would turn out...)
First, I placed a shirt that fit well on the fold of my fabric and traced it with chalk
(I made sure the stretch of the knit was going horizontally across the front of the shirt, not vertically. So, as you are viewing the bottom photo, the stretch is going from north to south....I think I am confusing myself....carry on...) 
  (please excuse my horrific chalk drawing. The boys decided to smash my tailors chalk into tiny bits so I used...um...sidewalk chalk instead. It was challenging.) 
Basically, the idea of the Dolman sleeve is that it is attached to the main body piece. I gave a generous curve under the arm and shortened the body of the shirt because I added a 4 inch hem piece at the bottom.
 The wide hem piece was smaller than the body of the shirt so I stretched it a bit while I sewed to make sure it had a nice, snug fit.
The back view
(Sorry for the blur. It is a bit hard taking pictures of yourself while you are not facing the camera)
I also did a cuff around the bottom of the sleeve with the same stretching technique I used for the wide hem.
 Rocking my pearls with my Dolman Darling Sweater
This sweet little shirt came together in less than two hours! That's my kind of project! 
Plus it is perfect for work, church, or casual wear. :D

Thursday, August 25, 2011

"I want to pray!"

I hate losing things, mostly because I hate looking for things I've lost. Even more than I hate losing MY things and looking for them is having to look for things OTHER people have lost. It just makes me want to ROAR!

Sadly, I have been roaring a lot lately because, as a mother of small children, I am constantly looking for things that other people ::ahem--said children:: have lost. This morning was no exception.

We had approximately 4.2 minutes to get shoes on, grab briefcase, lunch boxes, and blankies and rush out the door to preschool and work.  And Benji couldn't find his shoe.

This fact is particularly annoying because looking for his shoes is a frequent occurrence; no matter how many times I stress "YOU NEED TO PUT YOUR SHOES IN THE BOX SO WE DO NOT LOSE THEM, OK?????" he forgets. Because he is three (a fact I need to remember more often).

Plus, even more annoyingly, he will. not. wear. any. other. shoes. At all. That kid is OCD about his shoes if there was a kid ever OCD about anything. Thank you, dear Husband, for imparting this wonderful part of yourself to our child. I am praying it manifests itself in more productive facets (such as your timeliness and organization) when he gets older.

Anyways, he couldn't find his shoe. I am mad because I am rushed, running late, and hate looking for other people's things.

Me: (roaring) WE NEED TO FIND YOUR SHOE!!! LOOK FOR IT! NOW!
Benji: (crying a bit) I want to pray.
Me: WHAT?
Benji: I want to pray!

I didn't actually fully comprehend what he said the first time, though I heard the words he said. The thing is, last time he lost his shoes, we looked for them for a very long time (30 minutes +) and I was ballistic by this point. Then that gentle inner whisper reminded me that I need to slow down, take a deep breath and ask God to help us. So we prayed. And we found the shoes.

My little son remembered that prayer and wanted to pray for the shoes today.

Me: (kneeling down and holding him) Do you want to pray?
Benji: No, you do it.

So I did.

We didn't find the shoe instantly but pretty soon after that. I was so humbled. When I was running around roaring like mad, my son's first instinct was to pray. Which I know should be my first instinct. I do actually pray a lot when I lose things--but not before running around, slamming doors, and muttering wildly inappropriate words under my breath. I know when I stop and pray,  it isn't about saying the magic words to suddenly make the item appear--it is about changing my attitude, slowing down, and realizing that I need help. And then I always find what I am looking for. I know God has used my habit of losing things to build my faith.

Praying for lost things was an attitude that I wanted to pass along to my boys as a way to build their faith.

And it did even more for me today. My sweet son, whimpering because Mommy was ROARING about losing that darn shoe, challenged me to stop immediately and pray.

I feel like I am constantly convicted about how I am not doing enough to teach my boys about the Lord and Christian character.

Well, today, my son taught me.

We found the shoe and hastily threw a "Thank you" up to heaven as we ran to the car.

And I'm thankful for more than that, right at this moment.

Saturday, August 20, 2011

Character Pillows: A fast and easy project

This is a super-fast, fun and EASY project for those of you who think you can't sew "fancy-schmancy" toys for your kids--Character pillows! Your kids will think you are a GENIUS! 
A friend of my gave me these Cars decals (iron-on/sew on). I cut a pillow shape from some green/gray velvet in my stash and sewed around the edge of the decal (is that the right word? Cannot think of another one at the moment so there ya go...) Then I stitched up the pillow, stuffed it and machine sewed it shut on the end. DONE! EASY!
And happy kiddos! Thanks Mom!

(I was actually having a really bad morning when I made these. I'll blame it on PMS. Anyways, I spent a good 20 minutes chucking Lightning McQueen and the Policeman pillows at the boys. They thought it was great fun. And I got some aggression out. Win-win, right?) 

Tuesday, August 16, 2011

Goin' Crunchy: Homemade Laundry Detergent

I guess I am a little crunchy--you know, granola? Hippie? Make your own stuff-kinda-girl? Maybe it's my obsession over cloth diapers, who knows?

Anyways, I finally got up the courage to make some Homemade Laundry Detergent!
Supplies:
Ivory Soap
Borax
Washing Soda (NOT Baking Soda)
Hand grater
Container
Tablespoon

Maybe you have never heard or seen Borax and Washing Soda. They are actually really easy to find--I bought mine in the laundry aisle at Kroger. Amazing! And you can find Ivory soap anywhere. Ivory is good for this because it is pretty much pure soap--no fancy extra stuff. 
Stay pure, my friends.

Directions:

Grate soap with hand grater. If you had a food processor, I'm sure this would go much faster, but, alas, I do not have one. It really only took 3-4 minutes.
Admire your pretty pile of soap shavings. 
Then dump them into your container
Add one cup of Borax. Add one cup of Washing Soda. 
(I doubled my batch today so I grated 2 bars of soap and added 2 cups of both Borax and Washing Soda)
Stir for a few minutes (yes, minutes) with a wooden spoon. It takes a bit of stirring to combine everything completely. Smash any lumps up with the back of your spoon--the Borax tends to clump. 
When you are done stirring (2-4 minutes), it should look like this: Nice and smooth/crumbly
Add a Tablespoon to your mix. Cover.
DONE!

To use: Add one-two level tablespoons per load. We have an HE washer and this is perfect because it produces very low suds.

This is the second time I have made this (I didn't want to advise others to use it until I had used it myself for a while). One batch makes 32-64 loads, depending on how much you use. I have found that I need 2 TBS per load, as I like to cram as much in my washer as I can and I live with 3 stinky boys. I have also found that a warm/cold wash works better than cold/cold but this detergent works fine in cold water too.

As there are no added fragrances, the clothes come out of the washer smelling slightly of soap--a nice fresh, clean smell. 

Also, there are no brighteners or stain lifters. To compensate for that, because I live with 3 boys, I add one scoop of generic oxyclean to the drum of my washer (on the clothes, not in the dispenser). This seems to really help with stains and odors. Of course, pretreat really bad stains as you normally would. 

The really, really nice thing about this detergent is it is so cost effective. I bought the Ivory soap (3 bars), Borax and Washing Soda for a little over $14. After making three batches, I still have over half a box of both Borax and Washing Soda left. I will need to buy more Ivory next time I make some (which will be in a few months since I made a double batch today) but three bars at Walgreens cost less than $2. Math has never been my strong suit but I believe the final tally comes out to 3-4c per load. I would always cringe when I shelled out $20+ bucks for HE laundry detergent. Now, I have found something that is super cheap and works really well! 

So go ahead, be crunchy. Make your own laundry detergent.
It really works.  

Monday, August 15, 2011

The New and Improved BAM Diaper Cover

Remember this post: "BAM Diaper Cover: An Experiment"? I had several wonderful moms try out my diaper cover, some as far away as Alaska and Rhode Island! 
Here is what they had to say: 

I started using this diaper cover when my daughter was around 8 1/2 lbs.  Since our prefolds are all too big and bulky for this cover, I use my small gDiaper inserts.  That insert length works perfectly with this cover and keeps the messes in very well.  I haven't had problems with leaks and the cover and insert make for a very trim-looking diaper.  I love how easy this cover is to wipe off and clean.  The velcro fasteners create a very snug waist and fold back easily for washing.  I use several (size small) BAM all-in-one diapers and this cover has the same trim fit.  Overall, great cover! ~Erica

I wanted to update you on our Diaper Experiment. it's going GREAT! it has washed up well (no fraying or anything like that), we've had no leaks or blow outs, and it fits really well- even with xavier's chunky belly and thighs. so far so good! thanks for letting him be a guinea pig. :O) i like all-in-ones more than any other style of cloth diaper (just way easy!) but this is a close second. we're using mock g-diapers and that isn't going nearly as well as your's. ~Aya


So far, I *love* the cover . . . I really like how trim the cover is- the tabs over the hips are much thinner than bummis/motherease/kissaluv covers that I've used. This is really nice, because I feel like it makes it easier to move around in. The downside to the trim fit is that I doubt the cover would fit well over contours or fitted diapers. I have been using flats or infant-sized prefolds (which is my personal preference, since we change with every wet- about every hour the babe is awake). I did *JUST BARELY* manage to stuff a regular sized prefold in once, but there were big gaps around the legs from the overstuffing. I'd personally like to see a little more space in the butt of the diaper- we didn't have any "blowouts" while trying the cover, but I am a little nervous bc of the cover's tight fit that the it might not hold the mess in. ~Rachel

OKAY-We tried the cover over the last two days-with inserts, with pre-folds and with flats. The main problem we had was the fit. The material around the edges seemed to fold in on itself after it was prepped so that was tough also. It didn't want to stay flat while I was trying to get it on my son and since the fit was so small, it made it even harder. I don't know if the size was just off-my son is 9 weeks and just over 12 pounds now. I couldn't fit it over the flat diaper without tons of the diaper coming out. It was very trim, which I like but a bit too trim to really fit the diaper. I also couldn't get the waist tight enough while being big enough around the thighs. Aside from the rolling and the fit issues, it seemed to work well. The material left a bit of a red mark around the waist and thighs but it could have been from me trying to get a good fit. There were no leaks during testing either.  ~Laurie

So, there were some good things going on with the BAM cover:
Trim fit
No leaks

But some obvious problems too, the biggest being fit, a pretty important issue. 
I went back to the drawing board and designed a new cover, inspired by the FLIP system of diaper cover. The new BAM cover has been tested and it works well! 

So I would like to introduce the NEW and IMPROVED 
BAM Diaper Cover

 Same shape as the BAM All In One with fold-back laundry tabs
IMPROVEMENTS =
One layer of PUL (still thoroughly waterproof)
Wider through the legs and tush area
Improved elastic gussets in the legs and back

 Pocket in the front and back to keep prefold diaper in place 
The most important aspect I improved was the fit around the legs. I made sure that the prefold would fit in the cover securely without sticking out at all. 
The prefold (Chinese prefold, green trim) pictured is an Infant size and fits perfectly in this Small cover.  However, a Regular size prefold will also work if you fold the short ends in (as opposed to the long ends, as pictured above. Hope this makes sense). 

Using a cover and prefold system is a very economical way to cloth diaper your baby. For every dozen prefold diapers you buy (roughly $1.50 each), you only need 3-4 covers. 

BAM Diaper Covers:
Small (10-20lbs): $10.00
Medium (20-30lbs): $10.00

Please email me if you would like to place an order: bmeng@liberty.edu
Happy Cloth Diapering! 

Meng Menu


Saturday: Broiled Flank Steak, loaded smashed potatoes, salad
Sunday: Whatever
Monday: Chicken tacos
Tuesday: Fried Rice w/ pork and asian veggies
Wednesday: BLTs, pretzels, applesauce
Thursday: Italian baked chicken, pasta dish, green beans
Friday: Baked Chicken Tenders, baked fries, jello salad

Grocery shopping success this week! Can you tell that chicken was on sale? :) I spent $109 on food. YES! (I also went to Walmart to buy some school supplies for the boys as they start preschool NEXT WEEK and I also bought some stuff for the Kidz Kraze community yard sale so I am "over" budget concerning all those items. But as far as food goes, UNDER! YEA!!)

Friday, August 12, 2011

Tribute to my wonderful bird, Polly

My beautiful lovebird, Polly, passed away yesterday. She was born in 1989. Yes, you read that right. She was 22 years old. OLD, OLD, OLD for a bird. Really, for any pet. Lovebirds typically live 12-15 years so she was a senior citizen for a while. Her health had been failing for a while: she was blind, couldn't fly any more, didn't have a good grip, and would randomly fall off me onto the floor (sad, right?) Her favorite thing to do was snuggle with me, right next my neck with her feathers fluffed out--so sweet and warm. She had been having seizures for a while and the night before she died she had a few really big ones and Aaron and I could just feel the life ebbing out of her. I stayed up extra late that night holding her and stroking her and she seemed to be doing a little better when I put her to bed. But in the morning I found her stiff and cold at the bottom of her cage. 
Yesterday was rough. 
I got Polly for my 6th birthday. I had been wanting a pet for a while and the thought of a bird just really struck my fancy. On the day of my birthday I eagerly unwrapped a huge box that revealed a birdcage. Squeals of joy followed as my parents told me that we would be going to pick out my very own bird tomorrow after my sister's violin lesson. 
Well, that violin lesson was the longest violin lesson EVER. Seriously, it was like 3 hours long (definitely longest 30 minutes of my life!). We FINALLY went to the bird store (yep, they just sold birds) and picked out this little cutie. The store workers told us that lovebirds were especially good for young children as they were steady, friendly, and sturdy. 
"But don't lovebirds need a partner?" we asked. 
"No," the worker replied. "If a lovebird doesn't have a partner, he or she will bond with the new owner."

So that day we brought home this little bird, barely 6 months old, in a paper bag ("Don't sit on your bird on the way home!" the worker winked) and our magical bond was formed. 
One of the first things I taught Polly (named, at my parents urging, after Polynesia, the parrot in the Doctor Dolittle books) was to sit in my shirt--kinda weird, I know, but that way I could carry her around everywhere and kiss the top of her head every time I wanted to. Plus I didn't have to worry about her getting catapulted off my shoulder as I ran around my house like the crazy 6 year old I was. Though she never learned to talk, my sibling and I  taught her several tricks: how to give kisses, climb a ladder, play hide and seek (ok, not really) and ultimately, how to be really, really spoiled. I did teach her to poop on the trash can--one of our greatest achievements. I got to know her signals for when she needed to poop so I would swoop here down to the edge of the trash can so she could do her business. For a long while after that, she would fly to the trash can and perch on the edge (she didn't always sit in the right direction though to pop a squat. oh well). 

She loved to be out of her cage and would shriek to high heavens if she wanted to come out. Since I was homeschooled, I usually carried her around all day long in my shirt, her head poked out the top, or sometimes out the arm of my sleeve. She loved to shred paper and chew on Kleenexes as well as do a funny bobbing sort of dance at the bottom of her cage to get attention. She also loved to swing--once her swinging was so enthusiastic that the swing came off the hook at the top and she fell to the bottom of her cage. 
She also LOVED, I mean LOVED, people food. I probably indulged her way. too. much. She loved cheese, fruit, bread, and especially, candy. If I was eating a lolly pop, she would tug on the stick so hard that sometimes she pulled it out of my mouth. Then she would carry the lolly pop, her head hanging to the side because it was so heavy. She also loved to sit on the edge of water glasses and drink out of them, even if there were only drips at the bottom--she would stretch all the way down, with her toes barely hanging on the edge and lick up the liquid. Talented, that bird. 

When she was younger, she also loved to take baths. She would splash in her water dish, a glass of water, or a running tap in the sink and get completely soaked. She could come away from the bath looking like a cross between a drowned cat and one of those scary lizards with the big neck frill. 

We were separated during my college years but happily reunited during breaks. When I got married she came to live with me again--oh happy day! Thankfully, Aaron understood my obsession over this little bird and came to love her himself--though he often called her "Loud Fricker" under his breath (or out loud...). In our first house, he even build her a little bird house with a perch and food dish that she could sit in while she was out of her cage. They became friends--but I was still her favorite. 
That is, until I got pregnant with the boys. For the first 3 months of my pregnancy, Polly would not come near me. She only wanted to sit with Aaron. I would even get her out, shield her from Aaron by putting her on the opposite shoulder, and she would run across my collarbone and jump over to this shoulder when he was sitting next to me. I guess she could sense that something was different with my hormones. Crazy, huh?

When we brought the boys home from the hospital, we wondered how Polly would do with two little people competing for her attention. She was the perfect "big sister"--the first thing she did was preen Micah's head by running her beak down his fine downy hair.  She preened and licked his head for about 5 minutes. It was the sweetest thing ever. 
Me with my three babies 
(right after the boys came home from the hospital--hence the zombie-like look on my face)
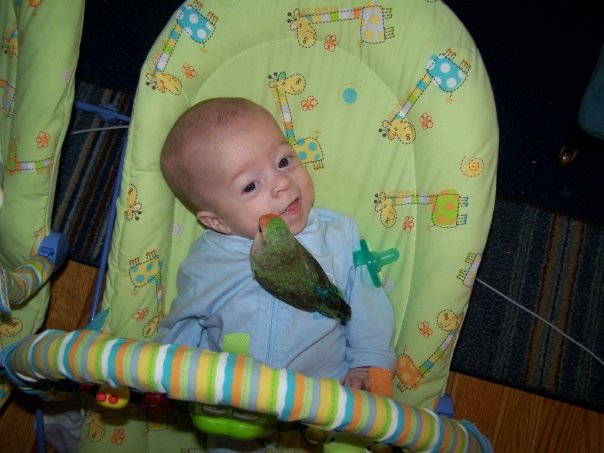
(Baby Micah)
Polly was great with the boys and really gentle
(Baby Benjamin) 
Of course, there was the one time that one of the boys roughly yanked about 6 feathers out of Polly's back. She was a little wary of them from then on. 
Micah especially, loved to hold Polly on his shoulder, even when he was a toddler
The hardest part so far (other than finding her yesterday morning) has been realizing that she is not there. My clockwork habit has been to immediately go to her cage after the boys go down for a nap or at night (she would remind me, even in her old age, with a chirp if I waited too long to get her out after the boys went down. She knew it was "her time"). Last night, as soon as I gave my last kisses to the boys, I automatically went to her cage. And it hit me hard. She is gone. The tears came again. And then the horrible, ugly, snotty wrenching weeping took over while I stroked my precious, beautiful little bird while Aaron dug her grave in the back yard. Death is so cruel. I had to put her in the earth and cover her up. How wrong and ugly and dirty and CRUEL. 
(I told Aaron, at least when she was in the freezer (where I had kept her all day) I can look at her whenever I want. He asked me if I wanted to keep her in the freezer, clearing indulging me as I was blubbering all over his shoulder. I said, I would say yes, but even I know that would be a little crazy. My sweet husband hugged me and agreed, yes, it would be). 

But I was crazy about this little bird. She was my best friend. She kept me company as a little girl and a confused teenage. She used to lick my tears off my face when I cried and nap in the little hollow under my neck on Sunday afternoons. She was soft, warm, sweet, and had a huge personality. I will miss her cheeps and her little head-butting "rrrents!" (only my family will know what I mean by that. :)

I love you, Polly and I miss you so much.
You were the best pet ever and I will think about you every day. 

Sunday, August 7, 2011

Meng Menu


Saturday: Date night!
Sunday: Leftovers (cleaned out the fridge! YEA!)
Monday: Baked Chicken tenders, mashed potatoes and gravy, corn
Tuesday: Salmon patties, cheese grits, steamed broccoli
Wednesday: Hot dogs, chips, fruit
Thursday: Spaghetti and meatballs, salad
Friday: Grilled Pork loin (on sale at Kroger this week!), rice, green beans

Grocery shopping was two-fold this week. I had to go the the store yesterday (with the boys) for the essentials (bread, coffee creamer...you know, the essentials!) and I also bought some school supplies for the boys (they got a list from preschool. Yes. In preschool, they already have a LIST. I am trying to buy a few things a week so that we can afford it). Anyways, I spent $39 yesterday. And I spend $97 today, which included $17 for pull-ups. So....overall, food-wise, I am under budget but as far as overall weekly shopping goes, I am $11 over. Stink. Oh well. I am not going to beat myself up too much. 

In other news, I am planning on making Cinnamon Swirl bread (from my Big Red Cookbook) for the 2nd time. I made it last week and it was absolutely delicious, especially toasted with butter. Yum! 

Sewing for me: Date Night Sorbetto Shirt

Aaron and I went on a date last night! I actually don't remember the last time we went out by ourselves--sad, huh? As a thank you to Aaron for his service as youth pastor for the last three years (and a good bye gift as this past Sunday was our last week at church), our church gave us a gift certificate to a super nice (expensive!) restaurant in downtown Lynchburg (right along the James River) called Shoemaker's Grille. 
Like every girl, I wanted a new outfit to wear out on our date! So, I decided to sew a new blouse. I have been following the Sew Weekly blog and she just did a series this past week on the (free pattern!) Sorbetto Shirt: check out her awesome variations on this blouse HERE
Here is my version: 
 I altered in a bit to fit me. The measurements said I was a size 8 for the shirt; however, while it fit in the bust, I had to take in the sleeves (pattern found here) and the sides of the shirt about 5/8 inch on each side. It still feels a little tent-y but the eyelet lace fabric I used has a lot of body to it. I am looking forward to sewing this pattern again with a fabric that has a little more drape. I also lengthened the shirt a few inches. 
After sewing the pleat the whole way down (as shown in the original) I didn't like the look. I unpicked it to a few inches below the bust line and really liked the way the blouse flows out at the bottom--very retro sixties. 
The best part of this pattern? It was so simple and I sewed the whole thing in just a few hours yesterday afternoon.  
 Paired with skinny jeans, a pink tank, peep-toe heels (sorry they don't show in the picture--they are my current favorite!) and my bouncy curly hair (I used this tutorial to achieve SUPER easy, heatless curls)...
(Aaron spent the whole day outside rafting with the youth group and playing softball...hence the sunburn)

...and we were ready for our date. We had such a nice time. The restaurant was beautiful and the food was DELICIOUS!! We got calamari for an appetizer and before our entrees we ate sour dough rolls and caesar salads. Aaron got a man-sized steak and amazing mashed potatoes with basil. I got to-die-for salmon stuffed with crab on a bed of garlic spinach with dijon sauce 

::singing angel voices:: 

I could only eat HALF of my entree--I was so full after all the pre-meal food. I would have loved to try the key lime torte (my all-time favorite dessert) but my skinny jeans were feeling uncomfortably tight by the end of the meal. Maybe next time.
Amazing food + wonderful conversation (uninterrupted by two extremely talkative three-year-olds) + feeling pretty in a new outfit while out with my husband = a perfect evening. 

Friday, August 5, 2011

PUBLISHED! "Tallow and Tuffet"

Remember this post:  "We are pleased to inform you..." ?

My story came out in Gallery of Worlds a few days ago!

Want a sneak peek?

“I don’t want to live this way anymore, Lila.” Jack patiently explained again. “The Traditions—they don’t make sense to me anymore. Maybe they will again some day, but right now, I’m…” he searched for the right word. “I’m defined. I just want a chance to write my own definition.”

The characters in this quote from my short story “Tallow and Tuffet” are curiously “defined”: both are characters from familiar children’s nursery rhymes—Jack of “Jack be Nimble” fame and Little Miss (Lila) Muffet. The nursery rhyme backdrop provides a sense of child-like familiarity, but the themes of searching for identity, breaking away from “safe” social constructs, defying tradition, and taking risks are ideas that young adults wrestle with as they move from the safety of socially-defined childhood to self-defined adulthood.

This fantasy story is set in “The Dell” where nursery rhyme characters live together, performing their personal traditions with acute daily faithfulness until one day,  Jack’s candle is snuffed out unexpectedly. “Tallow and Tuffet” uniquely begins and ends at the same moment with both Jack and Lila experiencing a type of loss that enables them, for the first time, to begin a journey of self-definition.

Check out "Tallow and Tuffet" in Gallery of Worlds on page 39! 

(Please leave me a comment here on Facebook if you read it! I'd love to hear your feedback!!)

Thursday, August 4, 2011

Watercolor Porch Painting

Need a creative project for your kids with little mess? Watercolor paint on your porch! No paper needed, no mess--if they spill the water, no big deal! We braved the morning heat and painted away. The boys loved it!! (Which always amazes me when I find a project that captures their attention for more than 5 minutes). 

Shadows curtesy of our tomato and peppers plants
I was asked to paint Walle. 
Benji is painting in the eyes. 


It got unbearably hot to we moved the painting indoors. Unlike the 25 focused minutes we spent painting outside, the inside painting lasted about as long as it took to take this picture. Oh well! 
We had a blast porch painting! And the best part is, just spray off the porch to clean up! 

Wednesday, August 3, 2011

Family Fun: Kiddie Pool!

This past week we set up our blow up kiddie pool! We actually bought it two years ago (wow, we were over ambitious parents) but this is the first time the boys have actually been able to enjoy it. In fact, we ALL enjoyed it last Saturday. Sadly (fortunately?) I don't have pictures of Aaron and myself in the pool--but we were living it up red-neck style, swimming' in the back yard. 
Hope you enjoy the pictures of the boys getting a break from the summer heat!


(Look at the camera boys! Ok, look! No, up here! Ok, 1, 2, ok, over here! 3! ....oh well)

Like this? Share it!

LinkWithin

Related Posts Plugin for WordPress, Blogger...